
How To Make A Platform Sofa
I should start this post by pointing out (although this will become obvious!) that we are by absolutely no means proficient at woodwork, and we have a limited selection of tools. I very much designed this sofa around these facts, taking an unorthodox approach, but it worked for us, and this is what we did…

THE PLATFORM
I designed the sofa to run the full width of the wall in our dinky TV room, which is just shy of 3m. This platform, needed to work as a chill out zone for all of us, and a guest bedroom when required (remember guests?), so I knew that a full size single mattress needed to be worked into the design, as I didn’t want to compromise the comfort of guests, or have to totally reconfigure the room to accommodate a guest. This way we just need to add a mattress protector and bedding to the middle section and it’s really to go.
The overall dimensions of the platform are 2970 x 1100 x 360 mm
You will need:
2x4 wood cut to size
Birch ply cut to size
Screws / relevant rawl plugs
Drill
Potentially a jig saw / multi tool depending on your walls and measuring accuracy
Adhesive
The frame:
I decided to buy a basic cheap bed base to act as support for the platform so we didn’t need to build a full frame, and then simply attach batons to the back and side walls to support the ply.
You could probably build a full frame relatively easily and not even have it attached to the walls at all, but as I said, tools and also time wise, this was the simplest version I could think of for us, given that Ed had no brain space at the time to think about it. So I just bought everything and then made him do it one weekend!
The back and left side are external brick / plaster walls, and the other is a stud wall, don’t forget to take your wall situation into consideration if you’re planning something similar.
I had some 4x2 cut to size and bought the cheapest most basic wooden base I could find from Wayfair.
My wood sizes were as follows, but obviously yours will be different to fit your space:
1 x 2400mm (back)
1 x 500mm (back)
2 x 1000mm (sides)
We attached the batons to the walls at the same height as the bed base. Our walls are super wonky, so as with everything in an old house, it wasn’t as straight forward as it should have been. I also had to remove some of the moulding, which was really simple using my multi-tool.

The Birch Ply Cladding:
I purchased grade BB/BB birch ply from Balls Pond Joinery. They’re old school and you have to phone or email for a quote (they’re based in Bethnal Green in E2). They were by far the cheapest I could find, and they actually had stock, where many places didn’t due to the pandemic.
I decided to risk the BB/BB grade ply (which is allowed to have patches and other knots/imperfections and is suitable for general work, where face grade is not overly important) even though it was only going to be oiled and not painted, knowing that most of it would be covered by the base cushions, and actually it was very good. I don’t know if I got lucky, but if the appearance of the ply is important for your project, you should probably look at purchasing a higher grade.
The maximum sheet length for ply is 2.4m. Well, you can get larger sizes but not easily or cheaply and I couldn’t find anywhere that would also cut to size, so I decided I was okay with a join, and used the following for the top. Again yours will be different to suit your project:
1 x 2200 x 1100 (top)
1 x 775 x 1100 (top)
1 x 2200 x 345 (front)
1 x 775 x 345 (front)
10 x 70 x 345 (front detail)
The total cost for all the wood (ply and the 2x4) cut to size and delivered was £285.
With the perfect angles of the ply pieces, it became obvious quickly, just how far from square our walls are, and we had to hack away at the sides of the ply to get it to fit. With a crappy jig-saw and multitool being our only wood cutting equipment, this was *slightly* frustrating, but we got there in the end. Once we were happy with how the two big base pieces were sitting, Ed secured them by screwing them onto the batons and into the bed base, then left me to it.

I only had half a plan for assembling the front at this point. Okay, I didn’t actually have a plan at all, but because there is carpet and therefore a cushioned surface, it turned out that the front pieces just stayed in place, sandwiched between the top and the carpet, so I decided to keep it super simple and I cut into the skirting at either end to create a cut out for the ply to slot into. Again we had two pieces to make the full length.

I spaced the trim out making sure that one piece would sit over the join of the two pieces to hide it. It also acts as a handle to access the void which we use as storage for the garden furniture cushions.
The detail pieces are just secured with the same adhesive I use for moulding. Something like no more nails is perfect.
I gave all the ply a light sand and oiled it with Osmo Polyx Oil in Raw, which has a very subtle white tint.

THE UPHOLSTERY
I had always planned to have the base cushions, but I hadn’t always planned to add the upholstered sides and back. I had originally planned to make some huge rectangular bolster cushions to sit along the back, but one evening I realised that I could repurpose our old headboard, which was about to be in the need of a new home.
The Channel Tufted Back and Side Panels:
For the back and sides, I re-purposed some of the panels from my old headboard. I needed to cut them down to fit and I mitred just the foam so it would sit nicely where the pieces meet in the corners, which I did by eye with a bread knife (ever the pro!), as my mitre saw isn’t big enough to cut through the 150mm wide wood. This has worked perfectly and I knew that the wadding and thick fabric would be very forgiving. You’d never know the foam underneath has literally been hacked at.
If you’re starting from scratch with this, you will need…
Wood cut to your panel lengths
For mine, which is three panels tall, I needed:
3 x 2970 x 150 x 20
6 x 900 x 150 x 20
Semi circle foam cut to panels lengths (you can get these online from efoam)
Foam spray adhesive (also from efoam)
Scissors
Upholstery fabric (I needed 12 metres)
6 or 8 oz wadding (same amount as you need of fabric)
Staple gun and plenty of staples
Note that larger panels are quite heavy once connected together.
To upholster, cut your fabric panels to size, making sure you have enough fabric to wrap right around. You need at least double the size of your wood or the diameter of your foam, so at a least 30cms for a 15cm diameter piece of foam and extra length at each end too. Better to have too much and cut off the excess than too little.
Place the fabric on your working surface (in my case the bedroom floor) face down. Add your cut to same size as the fabric wadding, then the curved side of foam then wood (or your wood with the foam stuck onto it foam side down) and get stapling! I recommend starting around the middle, getting a few staples in and then alternating between sides. Make sure you pull the fabric nice and tight and evenly so it doesn’t sag. For the ends I just make up whatever looks the neatest. I know, I’m SO technical. I also cut away some extra bulk so it doesn’t push it too far away from the wall when hung.
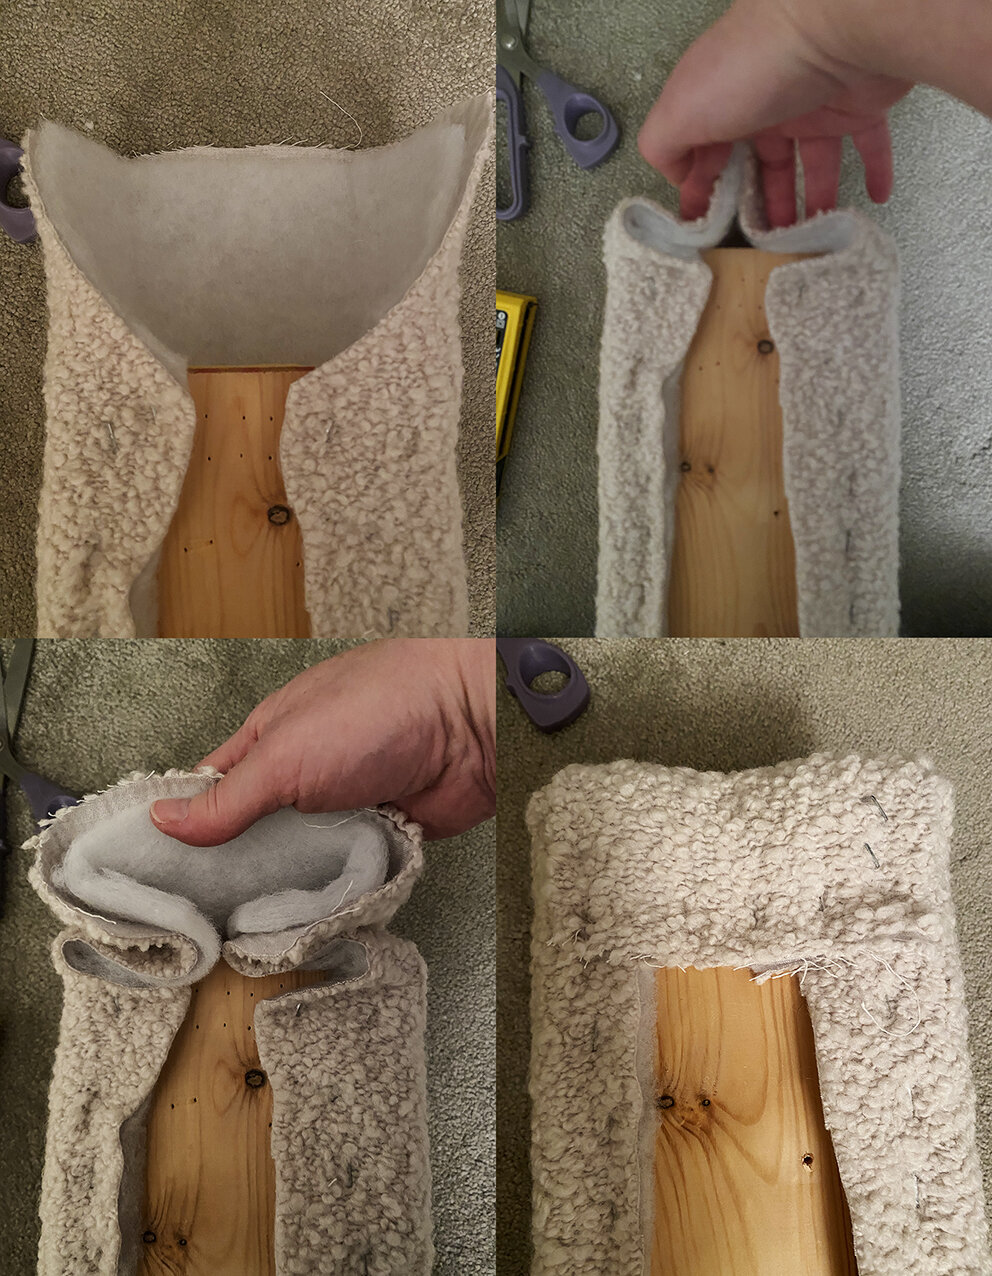
Once are your panels are upholstered you need to joint them together, so you will need some heavy duty strapping. That’s thick strips of metal with holes in it so you can place your panels lined up together on a flat surface face down, and put the metal straps on the back, and screw in (we used two straps on each side, and four across the back, you need at least two screws to go into each piece of wood, making sure you pull them together tightly). Make sure you get the right length to reach from almost the top, to almost the bottom of your full panel size. I used a 400mm size as my panels are 450mm tall.

To attach the now fully formed panels to the wall, you will need some Z-clips. They work like French cleats and will mean you can hook each panel to the wall without any visible gap. One piece is attached to the wall, and one to the panel, and then you lift your panel on to the wall to meet its’ partner and they slot together.
For the base cushions:
You will need
Foam for base cushions
Remember I needed one piece single mattress size for a guest bed (the middle piece so it is visually balanced) single mattress size so my foam measurements were:
2 x 50 x 90 x 14cms
1 x 198 x 90 x 14cms
Mine cost £220
I used medium density foam, cut to size from efoam and supplied this to my upholsterer along with 2cm thick memory foam (I bought a super kind size memory foam mattress topper for around £40 from Amazon) which she cut to size and bonded to the tops, then wrapped them in wadding.
The actual covers are made a bit smaller (3cms I think!) for a nice snug fit, and they sit perfectly (thank god) along the base even though the corners are not 90 degree angles, anything untoward is hidden thanks to the chunky back and sides.
My upholsterer charged £410 and lets just say I am SO HAPPY that I knew better than to take that on my self.
The fabric I used Zinc Zumirez Bouclè in Moonbeam. I absolutely adore it. It’s a wool mix upholstery grade fabric which is suitable for heavy duty usage (with a high abrasion / rub test score of 40,000 - Martindale, and 55,000 - Wyzenbeekm, for the fabric geeks among you).
And that is how we built our epic platform sofa. Works a treat, and we’re still piling in there in the evenings to curl up and watch movies, taking the least used room in the house to the most used.
Hope this helps if you’re considering making something similar. Make sure you let me know if you do!